Prepping for a drought (Part 7): Foundation protection
When we think of drought damage, we usually picture dead lawns and empty reservoirs, rarely a house literally breaking apart. Yet for homeowners living on expansive clay soils (common in Texas, the Midwest, and California), a severe drought poses a massive structural threat.
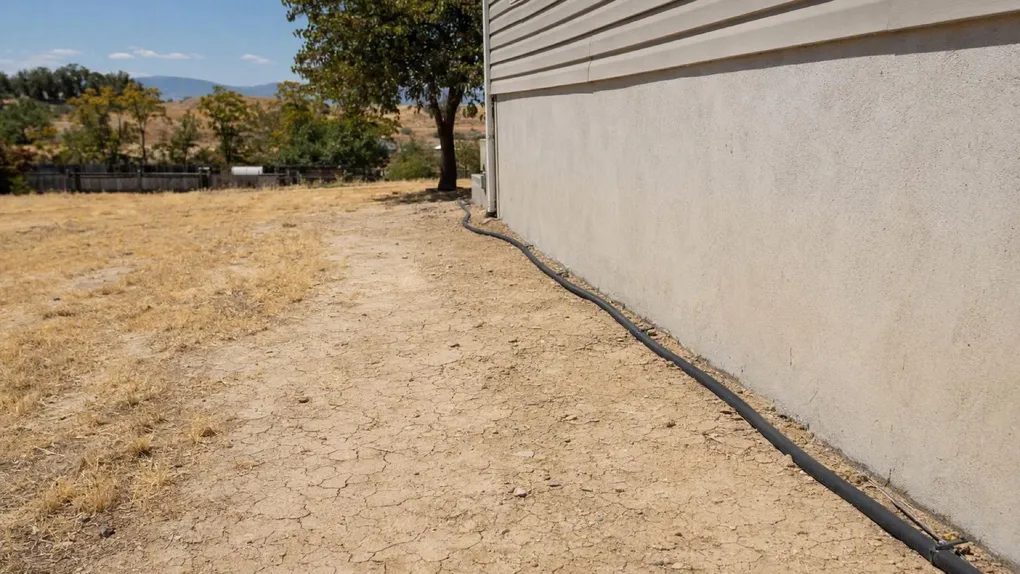
Your home’s foundation relies on the soil beneath it for uniform support. When clay soil dries out, it shrinks violently, like a sponge left in the sun. As the soil retracts, it pulls away from the concrete footing, leaving gaps of air where there used to be solid earth. Gravity takes over, the foundation settles into the void, and the house cracks.
The crack in my neighbor’s drywall started at the corner of a window and ran diagonally for three feet, and he spent a month blaming the house’s age before someone asked him the right question: had the gap between his soil and his slab gotten wider over the summer? It had, wide enough to fit his hand into. His house sits on clay. The drought had shrunk the ground beneath it like a sponge left in the sun, and the foundation was settling into the void the soil left behind.
A home’s foundation relies on the soil beneath it for uniform support. When clay soil dries out, it shrinks violently. As the soil retracts, it pulls away from the concrete footing, leaving gaps of air where there used to be solid earth. Gravity takes over, the foundation settles into the void, and the house cracks. Repairing a shifted foundation can cost tens of thousands of dollars. Preventing it costs the price of a garden hose.
This is the last part of the drought series, and it covers the damage that happens under your feet while everyone is looking up at the sky for rain.
Disclaimer: The information provided in this article is for general informational and educational purposes only. It is not intended as, and should not be considered, architectural advice. Soil types vary greatly by region. Consult a structural engineer or foundation specialist for specific concerns regarding your property.
The Readiness Audit
Is the ground under your house shrinking right now?
- Green: You have walked the perimeter this season, you run a soaker hose on a timer during dry spells, and the soil at the slab line is mulched.
- Yellow: You have sticky doors but have never connected them to soil moisture, and your foundation line is bare dirt.
- Red: You can see daylight between the soil and your slab and have not watered the perimeter once this summer.
If you are Yellow or Red, execute Phase 1 immediately.
Phase 1: The Physics of Failure (Expansive Soil)
Goal: Understand why the ground moves and why the house cares.
Many homes are built on soil with high clay content. Clay absorbs water and swells (lifting the house) and releases water and shrinks (dropping the house). The damage rarely happens from one dry day. It happens from cycles of extreme drying followed by sudden heavy rain, and this rapid movement snaps concrete.
The goal is not to make the ground wet. The goal is to keep it consistent: you want the soil to have the moisture content of a wrung-out sponge, not a mud puddle.
The Takeaway: Consistency is the whole game. The foundation does not fear the drought, it fears the swing.
Phase 2: The Inspection Protocol (Spotting the Danger)
Goal: Read the signals before they become invoices.
Exterior: look where the ground meets the concrete slab or basement wall. If you see a gap, sometimes wide enough to fit a hand inside, the soil has retracted and the support is gone.
Interior: your house will tell you if it is twisting. Watch for doors suddenly rubbing against the frame, windows that refuse to lock, new diagonal cracks in drywall coming off the corners of doors and windows, and uneven tiles or popping floorboards.
The Takeaway: Doors and cracks are the foundation’s early-warning system, and they are free to monitor. Check them once a month through the dry season.
Phase 3: The Defense System (Soaker Hoses)
Goal: Rehydrate the soil slowly and consistently.
You cannot water a foundation with a hand sprayer, the water runs off before it penetrates. You need slow-release irrigation.
- The tool: use a soaker hose (a porous rubber hose that sweats water along its entire length) or a drip line.
- The placement: lay the hose parallel to the foundation, approximately 12 to 18 inches away from the wall. If you place it against the wall, water can travel down the crack and pool under the slab, causing heave (lifting the house too much). You want the water to soak into the soil next to the house so the clay expands and seals the gap naturally.
- The timer: connect it to a faucet timer. Consistency is key.
The Takeaway: Twelve to eighteen inches out, on a timer. Close enough to feed the clay, far enough to never flood the slab.
Phase 4: The Watering Schedule (The Goldilocks Zone)
Goal: Water enough, but never too much.
- Frequency: during severe heat and drought, run the hose 2 to 3 times per week.
- Duration: run it for 15 to 30 minutes.
- The test: after watering, poke a screwdriver into the soil. It should penetrate easily to a depth of 6 inches. If it hits hard pack, you need more water. If it comes up muddy, you are over-watering.
The Takeaway: The screwdriver is the moisture meter you already own. Six inches of easy penetration is the target.
Phase 5: The Mulch Barrier
Goal: Keep the water you just applied.
Once you have hydration, you must stop evaporation. Cover your soaker hose with 3 inches of mulch to prevent the sun from evaporating the water before it does its job, and to keep the soil temperature cooler, reducing the rate of shrinkage.
The Takeaway: The hose and the mulch work as a pair: one delivers, the other keeps. Bare-soil foundations lose both ways.
The Essential Kit Checklist
- The perimeter walk: walk around your house and look for gaps between the soil and the concrete.
- The door check: open and close every exterior door, noting any that stick or rub.
- The purchase: buy a heavy-duty soaker hose (50 or 100 ft) and a simple mechanical faucet timer.
- The install: lay the hose 18 inches from the wall and pin it down with landscape staples.
- The mulch: ensure the soil around the foundation is not bare dirt, add mulch if needed.
Scenario Planner (Contingencies)
“We are on water restrictions, I can’t water the foundation.” The trap: assuming conservation rules ban all watering. The fix: most jurisdictions exempt foundation watering with soaker hoses precisely because foundation damage is costlier than the water. Check your local order and register any required variance.
“The crack is already there and 3 feet long.” The trap: DIY-ing structural diagnosis. The fix: the soaker hose stabilizes the soil going forward, but a diagonal drywall crack off a door or window corner is a structural engineer’s appointment, not a spackle job. Document the crack with dated photos before and during repairs.
Next Steps
- Walk the perimeter tonight. Soil-to-slab gaps are visible in seconds and they are the whole diagnosis.
- Install the soaker hose loop this weekend. Eighteen inches out, pinned, on a mechanical timer, and mulched over.
- Read the Drought Preparedness Guide for the complete series overview, from the leak hunt through storage, fire, and the ground beneath your feet.
Originally adapted from public university extension foundation-maintenance guidance (public domain).