The Emergency Response Guidebook (Part 1): Reading the placards
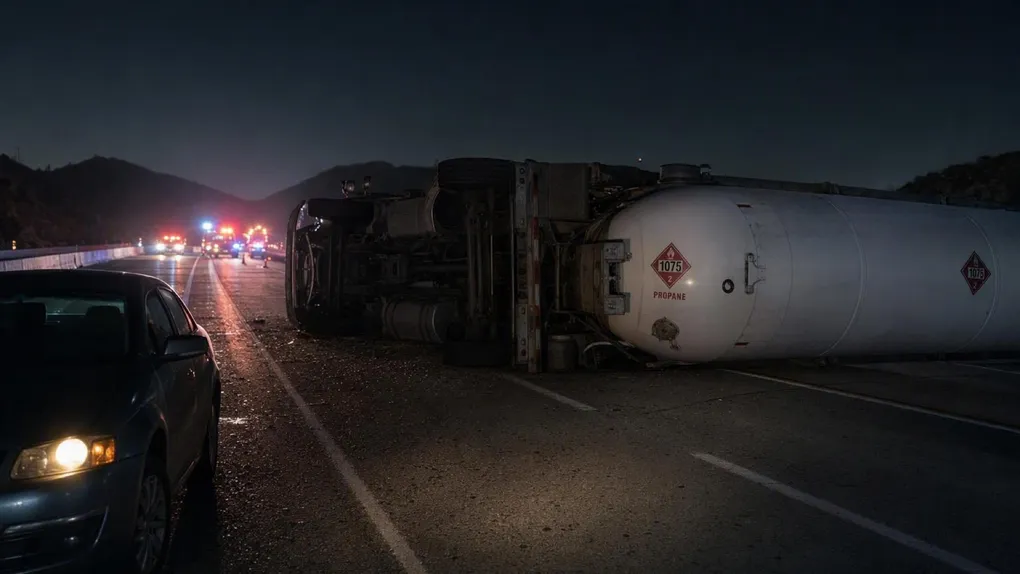
I was twenty minutes behind a tanker truck on a two-lane highway when the truck ahead drifted onto the shoulder and stopped. The driver got out and started walking back along the side of the trailer, and I saw why. A fitting near the rear axle was weeping a clear liquid onto the pavement, and the whole back of the trailer was wrapped in a diamond-shaped hazmat placard with a four-digit number on an orange panel. I did what most people do. I slowed down to look.
That instinct, slowing down to look, is exactly what the most widely carried emergency response book in North America is written to stop. The US Department of Transportation’s Emergency Response Guidebook 2024 (the ERG) rides in every fire truck in the country, and its first page of guidance is not chemistry. It is a single blunt instruction in capital letters: RESIST RUSHING IN.
This is the first part of a four-part series where I distill that guidebook for the rest of us. The ERG is written for first responders, but most of us live downstream of its decisions. We drive behind tankers, we live near rail lines, and our towns sit on top of pipelines. This part covers what the book teaches about identifying what you are actually looking at, from the placards on the truck to the papers in the cab to the markers in the field.
Disclaimer: The information provided in this article is for general informational and educational purposes only. It is not intended as, and should not be considered, professional or emergency-response advice. The Emergency Response Guidebook is written for trained first responders. In any hazardous materials incident, call 911, keep your distance, and follow the instructions of local authorities.
The Readiness Audit
If a tanker truck overturned near your home tonight, would you know which way to move and what to tell the people who come to help?
- Green: You know to move upwind and uphill, you can read a placard’s class number, and you know where the shipping papers are kept.
- Yellow: You would call 911 and stay back, but you could not describe what you are looking at, and your description is what dispatches the right response.
- Red: You would walk toward the crash to look, and you would drive through whatever is drifting downwind to get around it.
If you are Yellow or Red, execute Phase 1 immediately.
Phase 1: Resist Rushing In
Goal: Lock in the guidebook’s opening sequence, the part that applies before you know anything else.
The guidebook’s safety precautions page opens with that capital-letter command, and the reasoning shows up in the book’s own data. Most casualties in hazmat incidents are people who approached too close. Here is the sequence the book gives responders, which reads just as well as a civilian protocol:
- Approach cautiously from upwind, uphill, and upstream. Vapors drift downwind, liquids flow downhill, and runoff flows downstream. Position yourself opposite all three, and keep your vehicle at a safe distance.
- Stay clear of vapor, fumes, smoke, and spills.
- Secure the scene. Isolate the area and protect yourself and others.
- Identify the hazards using placards, container labels, shipping papers, the rail car and road trailer identification charts, safety data sheets, and knowledge of persons on scene.
- Assess the situation. Is there a fire, a spill, or a leak? What are the weather conditions? What is the terrain? Who and what is at risk: people, property, the environment?
- Obtain help. Get qualified personnel moving.
- Respond only with appropriate protective gear, and only after weighing whether rescue attempts will just make you part of the problem.
And the book’s own closing warning, which I want you to carry with you: do not assume that gases or vapors are harmless because of a lack of smell. Odorless gases or vapors may be harmful. The book adds one more line that surprises people: use caution around empty containers, because they may still present hazards until they are cleaned and purged of all residues.
Caution: The whole framework assumes one chemical and one source. If more than one hazardous material is involved, every distance changes. That is a job for professionals with modeling tools, not a guidebook.
The Takeaway: Upwind, uphill, upstream, and far away, and never trust your nose to tell you the air is safe.
Phase 2: The Paper Trail, What’s in the Cab
Goal: Learn where the most specific hazard information lives, because responders will go looking for it and knowing it makes your report better.
Before we get to placards, understand that placards are actually the second-best source of information. The best is paperwork. The guidebook devotes its inside front cover to shipping papers, and the book calls them vital for initiating protective actions. Here is where they live:
- Road: kept in the cab of the motor vehicle.
- Rail: kept in the possession of a crew member.
- Aviation: kept in the possession of the pilot or aircraft employees.
- Marine: kept in a holder on the bridge of the vessel.
A shipping paper lists the four-digit identification number (UN or NA), the proper shipping name, the hazard class or division number, the packing group, an emergency response telephone number, and a description of the material’s hazards.
The four-digit ID number may also appear on the diamond-shaped placard itself, or on an adjacent orange panel on the ends and sides of a cargo tank, vehicle, or rail car. That number is the master key. It unlocks the guidebook’s yellow section (the ID number index), which points to an orange guide, which gives the response protocol.
The Takeaway: Placards identify the hazard class. Shipping papers and ID numbers identify the actual chemical. Responders will want both.
Phase 3: The Nine Hazard Classes
Goal: Learn the classification system behind every placard you will ever see.
Every hazardous material belongs to one of nine classes, and the class number is printed in the lower corner of the placard, required for both the primary hazard and any subsidiary hazards:
- Class 1, Explosives, divided by behavior. Division 1.1 has a mass explosion hazard, 1.2 has a projection hazard, 1.3 has a fire hazard with minor blast or projection, 1.4 presents no significant hazard, 1.5 is very insensitive with mass explosion hazard, and 1.6 is extremely insensitive.
- Class 2, Gases. Division 2.1 flammable, 2.2 non-flammable and non-toxic, 2.3 toxic. (The book notes that “poison” and “toxic” are synonymous in this system.)
- Class 3, Flammable liquids (and combustible liquids in the US).
- Class 4, Flammable solids, split into 4.1 flammable solids and self-reactive substances, 4.2 substances liable to spontaneous combustion, and 4.3 substances which in contact with water emit flammable gases.
- Class 5, Oxidizing substances and organic peroxides (5.1 and 5.2).
- Class 6, Toxic and infectious substances (6.1 and 6.2).
- Class 7, Radioactive materials.
- Class 8, Corrosive substances.
- Class 9, Miscellaneous hazardous materials.
Two more marking systems are worth knowing. Intermodal containers often carry a two or three digit hazard identification number, and the book gives it a precise grammar. Doubling a digit intensifies that hazard (33 is a highly flammable liquid, more so than 30). An X prefix means the substance reacts dangerously with water (X88, X323). And on packaging you may see GHS pictograms, the red-framed diamonds with black symbols published by the United Nations, which come with a signal word and hazard statements.
The Takeaway: The class number is the fastest fact you can capture from a distance, and it is what a 911 dispatcher will ask you for.
Phase 4: Reading the Vehicle Itself
Goal: Know how professionals identify a hazard when nothing is labeled.
The guidebook’s placard table is for exactly one situation: when the ID number or shipping name is not available. The steps the book gives are worth knowing, because they encode the caution:
- Approach from upwind, uphill, and upstream, at a safe distance, and use binoculars if you have them.
- Match the vehicle’s placard to the table.
- Use the circled guide number. The book gives three examples: GUIDE 127 for a FLAMMABLE (Class 3) placard, GUIDE 153 for a CORROSIVE (Class 8) placard, and GUIDE 111 when the DANGER or DANGEROUS placard is displayed, when the material is unknown, or when you suspect hazardous materials but can see no placards.
- If multiple placards point to different guides, use the most conservative one, the guide requiring the greatest protective action.
The vehicles themselves are identification. The rail car identification chart distinguishes pressure tank cars, non-pressure tank cars, hopper cars, and cryogenic tank cars, each with different failure modes. Road trailer charts do the same for tanker shapes. An experienced responder can tell a lot from silhouette alone.
Caution: Use the placard table only when nothing more specific is available. A four-digit ID number or a shipping name always beats a placard, because a placard identifies only the hazard class, never the chemical.
The Takeaway: Placard first, class number second, chemical name when you can get it. Each step sharpens the picture responders need.
Phase 5: The Hazards That Do Not Ride on Trucks
Goal: Broaden your picture, because most of us live closer to pipelines than to rail yards.
The guidebook devotes a full section to pipelines, and for good reason. North America moves natural gas, crude oil, gasoline, diesel, anhydrous ammonia, and jet fuel through millions of miles of buried pipe. Natural gas transmission lines run at 200 to 1,500 psi, and transmission pipelines are the ones marked with above-ground markers that identify the product and the operator’s telephone number. Distribution lines feeding your neighborhood are typically not marked, and neither are gathering lines.
The book lists the signs of a pipeline leak or rupture, and this list is worth committing to memory because pipelines run through farm fields, along road corridors, and behind subdivisions:
- Hissing, roaring, or explosive sound
- Flames appearing from the ground or water, sometimes very large ones
- Vapor cloud, fog, or mist
- Dirt, debris, or water blowing out of the ground
- Liquids bubbling up from the ground or bubbling in water
- A strong odor of rotten eggs, skunk, or petroleum
- Discolored or dead vegetation, or discolored snow, above a pipeline right-of-way
- An oil slick or sheen on water
- An area of frozen ground in summer, or unusually melted snow in winter
The book’s rules for anyone near a pipeline emergency are blunt. Never operate pipeline valves except in coordination with the pipeline operator. And never attempt to extinguish a pipeline fire before the supply is shut off, because an unlit leak accumulates a vapor cloud that can explode.
The Takeaway: If your land or neighborhood borders a pipeline right-of-way, dead vegetation in a neat line is not a landscaping problem. It is a 911 call.
Phase 6: What To Say When You Call
Goal: Make your 911 call carry the information that actually moves resources.
The guidebook’s notification section is written for agencies, but its information checklist is exactly what a good civilian report contains. Call 911 first. The book then lays out the escalation: notify the emergency response telephone number on the shipping paper if you have access to it, then national assistance. Federal law requires that releases of reportable quantities be reported to the National Response Center at 1-800-424-8802, and the book is careful to note that calling a commercial hotline like CHEMTREC (1-800-424-9300) does not satisfy that legal requirement.
When you call, be ready with as much of this as you can:
- Your name and a call-back number.
- The location and nature of the problem: spill, fire, or leak.
- The name and identification number of the material, if you can read one from a safe distance.
- The shipper or point of origin, if visible on paperwork or markings.
- The carrier name, rail car number, or truck number.
- What you can see: container type, vapor cloud, fire, and wind direction.
Then follow instructions. Your value at a hazmat scene is as a reporting instrument, not a rescuer.
The Takeaway: A good report is specific and delivered from a safe distance. Distance first, description second.
The Essential Kit Checklist
- The class card: A card listing the nine hazard classes in your glovebox, so you can read a placard’s number and know what it means.
- The binoculars: A compact pair in the car. The guidebook’s own placard procedure says to use them from a safe distance.
- The number that matters: National Response Center 1-800-424-8802, written on the same card. (You still call 911 first.)
- The pipeline picture: Know whether a transmission pipeline right-of-way crosses or borders your property, and where its nearest marker is. Markers list the operator’s emergency number.
- The smell discipline: Teach the family that no smell does not mean no hazard, and that a strong rotten-egg odor near a right-of-way means leave and call.
Scenario Planner (Contingencies)
“I did not smell anything, so it is safe.” The trap: trusting your nose as a chemical detector. The fix: the guidebook’s own words, odorless gases or vapors may be harmful. Some of the worst industrial gases give you nothing to smell, and some toxic gases deaden your sense of smell after the first whiff, which is worse. Wind direction and distance decide safety, never odor.
“The liquid is clear, so it is probably just water.” The trap: reading spill severity from color. The fix: the shipping paper example in the guidebook shows isopropanol, a clear liquid, riding under a flammable placard. Appearance tells you almost nothing. Placard, ID number, and container shape tell you almost everything.
“There are no placards, so nothing dangerous is on that truck.” The trap: treating absence of markings as absence of hazard. The fix: the book created GUIDE 111 precisely for this case, for when hazardous materials are suspected but no placards can be seen. Empty containers and partially labeled loads are real. Report the suspicious vehicle the same as a labeled one.
Next Steps
Do these four things this week, in order:
- Read Part 2: Evacuate or shelter to learn the decision factors that decide which protective action keeps you alive.
- Write the number down. National Response Center 1-800-424-8802, on a card in your glovebox, next to the nine hazard classes.
- Walk your pipeline picture. If a transmission pipeline right-of-way crosses or borders your property, find its nearest marker and read the operator’s emergency number off it.
- Wire the family habit. Everyone old enough to drive should know the four rules from Phase 1: upwind, uphill, upstream, and far away. If your family needs a calling tree to make that stick, start with the family communication plan.
Adapted from US DOT/PHMSA, Emergency Response Guidebook 2024 (public domain). Read the original: Emergency Response Guidebook 2024.